|
The Photographs and what they tell us A picture says a thousand words, or so the saying goes. Barring image manipulation, any photograph is testimony to the truth even if poorly executed. It will reveal something about the subject that was otherwise not known.
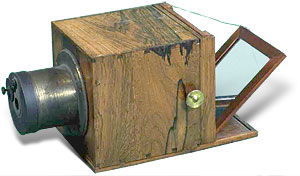
In the 1850s, the images were just as pedestrian - relatives, events, landscapes, still life - all playing an important role in recording the life of that time. By 1850 the art of capturing images was becoming much easier and those wishing to take up the pursuit of photography could readily purchase all the necessary apparatus, set up a dark room in some private place and start taking pictures. The idea that a photograph of the Craig Telescope did not exist was more of a puzzle than believing one did. Remembering that the instrument stood on the common for some 19 years, someone would have captured its portrait or at least had the tower in the background with friends and dear ones posing in the foreground. It would be just as today, with many tourists wanting to show that they had been to London and stood in front of Buckingham Palace or the London Eye. That moment of truth as it were. However, despite many hours of investigation no photograph was found - no daguerreotype, no collodion, no postcard and no printed image in a long forgotten publication. Many private collections were probed but to no avail.
However, the articles about searching for telescope's remains made in the summer of 2003, provoked a marked interest in the local community of Wandsworth and it seems that some were moved to look in their own family albums. On 6th January 2004, the Craig Telescope Project Director's birthday, an email was received saying a photograph did exist! Not all early amateur photographers were blessed with the gift of an artistic or compositional eye and many images were spoilt not because of the photographic processing but simply because the image had not been thought through. This new photograph, however, met all the criteria of an image that was special. Despite its tiny size, only being about 60mm on a side, it showed remarkable detail right down to the individual bricks. back to top of page >> The image was magnificent. It was also a bearer of the truth - a truth that put to rest some of the debate about the telescope. But equally it raised a number of new questions.
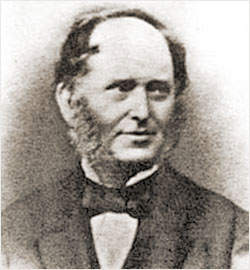
His photograph of the Craig Telescope borrows much on his skills as an early pioneering photographer, for aspects of the image reveal something of the equipment used. Notice, for example, how the tower does not taper as it would in a simple camera. Bevington must have been able to skew his camera lens independently from the negative holder. This simple fact shows that he not only had some fairly sophisticated equipment, but that he also knew how to use it and use it well. The Bevington Photograph  This single image shows that the telescope was not an instrument that would have been loved by many astronomers. Just standing by this absurd construction would have given most a feeling of foreboding, not one of cutting edge technology ready to prise open the secrets of the cosmos.
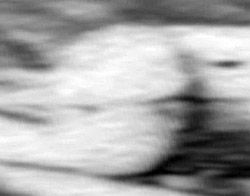
 The first thing that strikes one are the buildings. Not just the telescope tower but all the other buildings in the background surrounding it. Do they belong to the telescope project - if not why would Bevington have included them in his image? If they do belong to the project why do some outside the enclosure set aside specifically to house all the workshops and accommodation? Can the picture be used to supplement our knowledge of the telescope and get an understanding of how it was built and who might have helped in its construction beyond those known to have made a direct contribution? Certainly it would suggest at first glance there is organisation. There are a number buildings or outhouses. If they did indeed form part of the site's operation they would have served a number of functions. It is almost tempting to give them jobs of work to do. back to top of page >> The Diamond Photograph 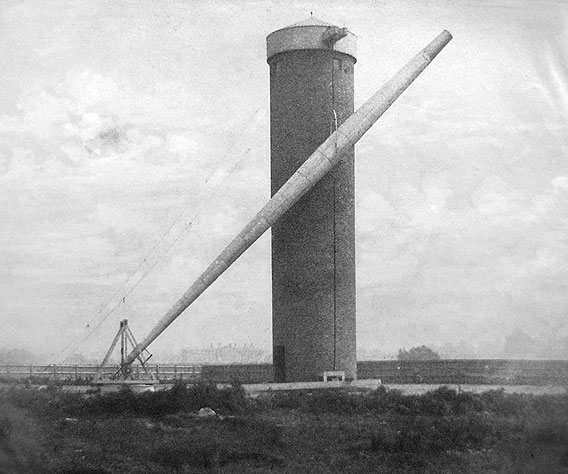 The Evidence How do all these buildings line up with the Stanford map of 1862. The site as shown on the map has three buildings within the two acre bounding area of Craig's telescope - the telescope itself and two "square" buildings on the northern boundary. However, there are more buildings in the photograph than shown on the map. One reason for this dichotomy could be that the map was drawn at a time when there were only two buildings on the northern boundary, some of the more "constructional" buildings having been removed by the time Stanford did his survey of the area. Or the map may reveal a more pragmatic truth - that the instrument had fallen into disuse and had to all intense and purposes been abandoned, leaving only the telescope's tower and two of the more substantial outhouses. 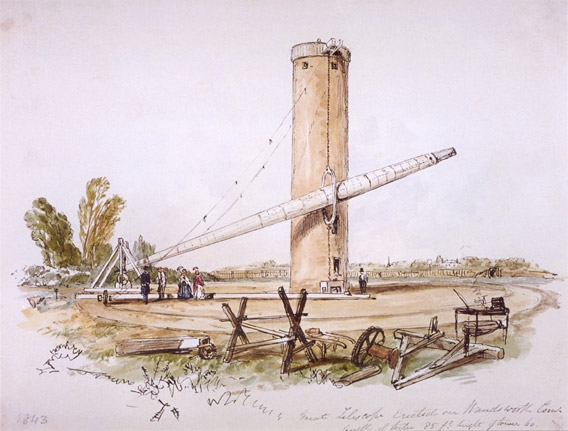 One other aspect of the photograph that should be taken into account is where was Bevington's camera when the picture was taken. If the Stanford map reveals at least a partial truth, then Bevington's picture was taken from the southern end of the site looking north. The long low building to the left of the tower is the same as that recorded in the deeds map of 1865.0 The wooden fence, put up to prevent intruders from gaining access to the site, reveals that the ground around the telescope was not level or flat. Although not visible in the image, we can only assume that the outer rail was also not flat! Normally, designers would make sure that every aspect of the instrument was controlled as much as possible; it is surprising therefore, that the ground around the tower was not leveled. If this assumption proves correct, this would have meant that as the azimuth arm and dolly were repositioned, clockwise, during an observation, the vertical alignment of the tube would also have moved, making the realignment of a celestial object in the eyepiece all that more complicated. The image reveals many important details; some suggesting how the telescope might have been managed. On the extreme left is what appears to be a long single storey building with a pitched roof. While the image is at the limit of the finest detail, it is possible to make out that the roof is corrugated. By running ones eye grazingly along the photograph to foreshortening the detail, it is noticeable that the structure has a lift in the roof. There could a number of reasons for this, firstly, that the building is in fact three buildings lying close to each other, so close that their subtle tones of light and shade make them merge into one. However, this is unlikely as the ground levels off and begins to fall away at this point, so the structures behind would have to be taller to make up the difference. Secondly, it could be a single structure, but one that has been modified, its central section strengthened to bear the load of, say, the telescope's tube during construction, so that it could be fully fabricated and then balanced before being mounted onto its hoop and chain. However, this building proves a bit of an enigma, for it seems to lie outside the tall bounding fence of Craig's site. There is reference to a long building in the Stanford map. It too lies outside the fenced area, and shows as belonging to the estate of Burntwood House. So, while it may have nothing to do with the Rennie company's construction work on the telescope's tube, it is possible that shared economies would have allowed Gravatt more space on site for other works, while eventually giving the Burntwood estate a new set of, say, pig pens. It is interesting to note that the length of the "long" building on the Stanford map conveniently matches that of the tube! back to top of page >>
To its right is the largest of the outhouses. This two storey building is by far the most ornate, having what appears to be a small weather station on its roof - complete with weather vane. Could this have been a visitor block, allowing astronomers accommodation during periods of inclement weather? Judging by the chimney, it had internal fireplaces - vital during the long winter evenings. It had perhaps six rooms. Although two storey, the position of the windows just under the eaves, shows that the internal ceiling height must have been low. This could have been one of the first buildings to have been constructed on the site. Further to the right, behind the dolly, are two more buildings. Their simple pitched roofs and functional status would indicate storage or workshop facilities. As for the tower and the tube, many features are as those shown in both the "Beard" engraving and Sargent sketch. It is very clear that the tube had a short 1.5 to 2 metre section near the eyepiece that was slightly smaller in diameter than the rest of the tube and that it either tapered less or was of the same diameter all the way along its length. This may provide a significant clue to understanding the telescope's operation and focusing mechanism. The tube was made of panels; the photograph shows them to be about 5-feet long and 2-3-feet high. These panels were riveted to a fine ribbed superstructure with each rotated one eight of the circumference about the central axis. The dolly, far from being more elaborate as in earlier engineering proposals, seems more like the dolly seen in the "Beard" engraving. The frame, made from wood and consistent with earlier proposals, has limited cross bracing. The eyepiece end of the tube is supported in a simple sling. By comparing both the Bevington photograph and the "Beard" engraving, it is easy to see similarities in both, although it is equally clear that the "Beard" engraving is not of a finished dolly, since for example the two large adjustment wheels are not in evidence nor is any of the wooden cross bracing at the front (or back) of the dolly. A railway sleeper has been placed on the azimuth arm just in front of the dolly to prevent unintended movement. The Bevington photograph has more secrets to tell about the state of the telescope. Notice that the counterweight is not opposite the hoop as it would be if the instrument was in a working condition. By employing state-of-the-art CAD applications it is possible to look at the image from different angles and see what other things are not quite right. We know that the azimuth arm could not move along the outer rail by an angle exceeding 8° degrees because it would begin to put too much strain on the hoop and chain. Since the angle in the Bevington picture is clearly larger than this, it must mean that the hoop and tube are effectively detached from the tower. Also, when the tube is at its lowest position, the counterweight must be at its highest. But the counterweight is not at its extreme elevation, so it must also be tied off in some way independently of the hoop and tube. Although not easy to spot, the chain dangling from its underside appears to be loose; and significantly, the take-up winch is not directly underneath. The azimuth arm is bent. When the image is foreshortened the bend in the arm is shown not to be simple. For the most part the arm rests on the ground but the angle changes quite abruptly because the outer section is held slightly aloft by the two wheels resting on the outer rail. The abrupt change may indicate that the structure was somewhat stressed and that if the telescope continued to be used this part of the instrument may have failed, suffering from fatigue cracks. The winch is difficult to see; partly because it is somewhat camouflaged by the background brickwork. However, sufficient can be seen to establish how it looked and worked. As has been stated in the previous chapters, the winch was a simple affair mounted onto a wooden platform which in turn was mounted onto the inner train. As can be seen in the photograph, inside the skeletal framework is one large cog. This would have been attached to the main chain pickup. On close examination of the image there is a large "white" oval. This could be real - its purpose unknown, or simply a part of the image that lacked the photosensitive coating when the photograph was taken. back to top of page >> There are no reigns attached to the the tower - they have been removed. This is not something that would have been the case for everyday operation. Looking at the dolly more closely there are what appear to be errant ropes hanging loosely on its structure. Perhaps these are the reigns having been discarded. Taking into account the state of the tube with its noticeable rust marks, we begin to see an instrument long past its best. Perhaps one that has been abandoned already. Clearly seen in the photograph are the well discussed "windows". These are rendered in the Sargent drawing as having either no glass in them or that they are swung open. Indeed, from his sketch, one proposal was, that they acted as "portals" for maintaining the hoop and tying off the telescope when not in use. In Bevington's photograph, however, they have glass in them and demonstrate that their delicate nature would have been unsuitable for any form of maintenance or tying off, especially in the dark. But perhaps they were portals in the first instance, only later having panes added as their function became obsolete. The counterweight hangs near the top of the tower. We have already established that the instrument was probably not in use and that the chains are hanging loosely with the winch not directly underneath. From close inspection it is possible to see that the chains for supporting the counterweight and for winching were not the same gauge and that there is a "barge-board" on the counterweight's tower side. Reverse Engineering Because of information gleaned from the Bevington photograph, the authenticity of reference points in the Sargent illustration can be confirmed. By using the 1862 Stanford Map to verify small but significant distant spires or buildings, it is possible to reverse engineer this information to find out more about the construction of the telescope. One of the over-riding facts of the Craig Telescope is its basis as an astronomical building; so what we see in any picture should demonstrate clearly that the designers and builders had encapsulated some fundamental astronomical features. So what do we see? Both the sketch by Sargent and Bevington's photograph show the two "windows". As has been suggested in earlier chapters, the "windows" may have had more than just an aesthetic appeal, but one of function, maintenance or procedure. Astronomically, these windows would normally have been aligned either on the north, east, south or west side of the tower. But by establishing the positions of both Sargent, when he sketched his impression, and of Bevington, when he capture the tower's likeness, it is possible to reverse engineer these points to see if the building had an astronomical directionality. In the Sargent sketch there are two distant structures. One appears as a strange church spire and the other as a relatively large building. Despite his whimsical almost dismissive linework, Sargent has shown these two buildings in their correct positions and given them their proper status. The large building shows up on Stanford's Map as Jame's Industrial School. It is clearly marked as being large, set in sizeable grounds. Since the landscape lying east of Sargent (the direction in which he was looking) is relatively flat and level, he would have seen this building easily. Due to the accuracy in Sargent's placement, the tower or spire proves to be that of St Mary's Church in Balham, right next to Balham Station on the west side of Balham High Road. It is still there today. Its spire is rather ornate, resembling a tall stretched wedding cake. Bevington's photograph can be used in much the same manor. We have established that the outhouses shown, seem in the main to be those on the Stanford Map. So by establishing Bevington's own position when he took his image it is possible to confirm, more or less, the positions, not only of the outhouses but also of Sargent. We are now able to say with some degree of accuracy, that the tower's "windows" were facing west, but not exactly west. Indeed, the closest approximate alignment is facing the lane, now Lyford Road. So it seems the designers, did indeed design a building, but not strictly an astronomical building - where everything about it should have be based around the sky; no, they just designed a building. Dating the Bevington Photograph Geoffrey Bevington did not make a note as to when he took this picture. The only annotation on the photograph states "TELESCOPE ON WANDSWORTH COMMON", which may not have been written by him. Other photographs in the album do not suggest a specific date. So we are left only with information that may be hidden in the photograph itself. Looking at the picture, it is clear that the site is overgrown and there are trees in the background. The shrubs in the foreground are gorse bushes; the characteristic shape of the branches can be clearly seen against the brickwork of the base of the tower. Gorse is a common species found on this kind of lowland heath. There is also a hint of long, dead grass in between the gorse. The tree outlines in the background, show many bare branches with the trunks silhouetted against the sky. However, there is little branch-tracery evident on some of the trees which might suggest that they have still to shed some leaves. The fact that it appears some of the trees have moved during the exposure could create a false impression of foliage. back to top of page >> The identification of the trees cannot be ascertained with any degree of accuracy. However, all appear to be broad leaved species. Those having the strongest silhouette, could be oak, beech, ash, or indeed birch - a tree that thrives on heathland. Because these trees appear on the boundary line between properties, they may be a combination of planted and semi-natural woodland. Between the dolly and the accommodation block is a small foliated tree; it has a round crown and resembles a broad leaved species rather than a conifer; suggestive of a holy tree. The large tree to the right of the tower seems to have some small dark blotches at the ends of the branches, these might be bunches of seeds, characteristic of an ash tree. The very upright trees just right of the accommodation block are characteristic of the Lombardy poplar, which was widely planted in the nineteenth century. The sky seems overcast, although judging by the distinct shading on the side of the tower, the level of illumination was quite high with the sun probably at a low inclination. Overall, the many bare branches on the trees - the long dead-grass - the low sun angle - trees still in leaf and the possible presence of ash keys, all suggest that this picture was taken in autumn or early winter. What of the year? Could the condition of the telescope itself show how long it had been standing there before the photograph was taken? We have already suggested that the photograph reveals a dysfunctional telescope - that some of the parts were not even connected up. There is also rust, although the amount shown is not too severe, but if the tube had been painted, say, two years earlier to protect it from the rigors of the weather, then only now would some parts be showing any sign of deterioration. With that in mind the most probable year would have been 1855 or 1856, shortly before the telescope was completely dismantled, leaving only the tower ...and finally One or two incidental items are seen in the image that at first are almost hidden in the mix of tones. At the base of the tower on the right side there is a light rectilinear area. At first, because of its alignment it seems it might be a path leading to the small gate seen in the distance. However, despite this first assumption, it could be a box-like structure resting on the azimuth arm - but why? The path idea is certainly good because it makes sense. The light tone matches that of the other structures in the scene and its alignment is just too obvious, but doubt still remains. Lying on the ground just under the azimuth arm is a small conical item. Despite close examination its purpose is still unknown. Its dimensions and shape are very similar to a dunce's cap. Perhaps this small item bears testimony to the idyll of the ‘scope. back to top of page >> |
|